

Transaction Flow
This page details the complete transaction flow for the Get Smart App2App integration, from initiation to completion.
Overview
The App2App integration follows a synchronous request-response model where your application initiates a transaction, the Get Smart application processes it, and control returns to your application with the result.
Transaction Lifecycle
A complete transaction passes through four distinct phases from initiation to completion. Understanding each phase helps you implement proper error handling and manage the user experience effectively.
Phase 1: Initialization
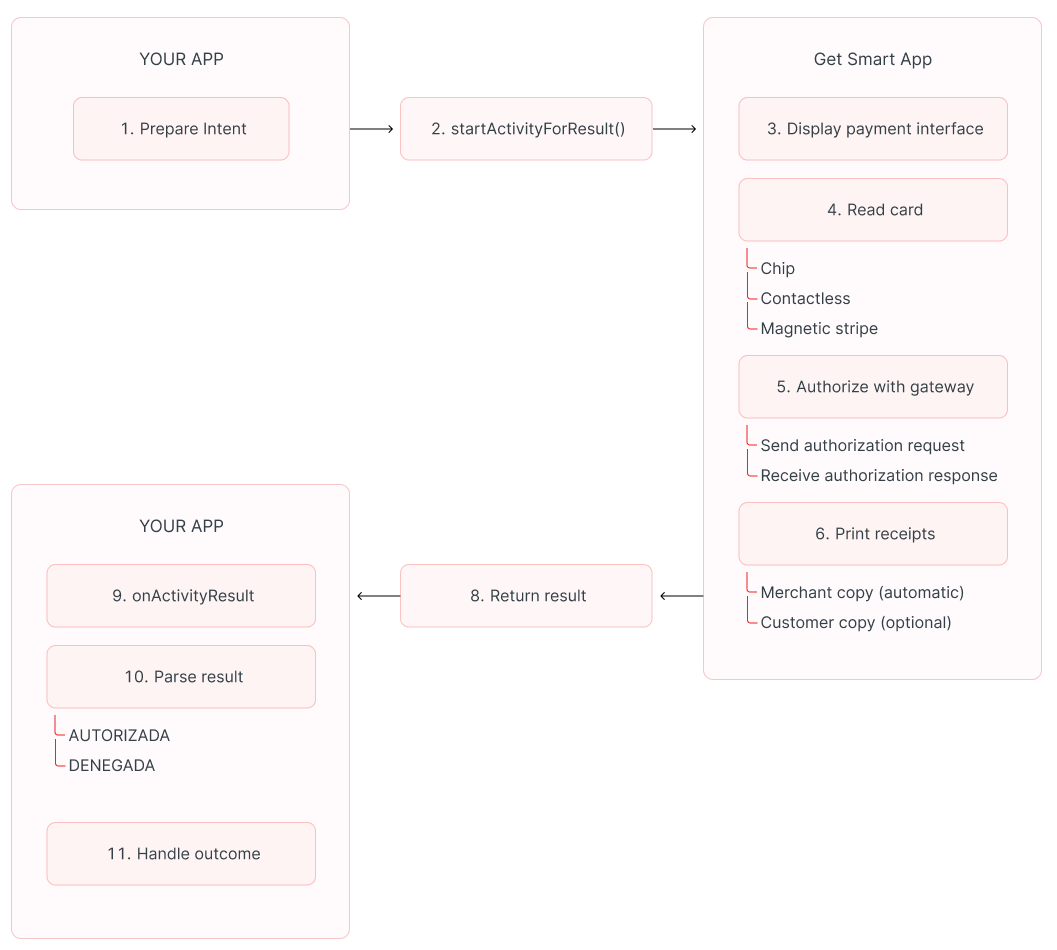
Your application prepares the transaction request by gathering transaction data (amount, type, invoice number), creating an Intent with the specific action name, and adding the required parameters as Intent extras.
Phase 2: Launch
Your application launches the Intent using startActivityForResult and transfers control to the Get Smart application. If the Get Smart app is not installed, an ActivityNotFoundException is thrown that your app must handle.
Phase 3: Processing
The Get Smart application takes over to display the payment interface, read the card, communicate with the authorization systems, handle receipt printing, and prepare the result Intent with transaction details.
Phase 4: Completion
Control returns to your application through the onActivityResult callback. Your app verifies the request code, checks the result code to determine if the flow completed or was cancelled, parses the response data from the Intent extras, and processes the outcome according to your business logic.
Detailed Flow Diagram
The following diagram illustrates the complete transaction flow, showing the sequence of operations and data exchange between your application and the Get Smart application.
Result Codes
Transaction results are communicated through two levels of status codes: Android’s standard result codes indicate whether the flow completed, while transaction-specific result values indicate whether the payment was authorized.
Android Result codes
The standard Android resultCode parameter indicates the completion status:
| Result Code | Meaning |
|---|---|
RESULT_OK | The Get Smart app completed its flow and returned a result (authorization or denial) |
RESULT_CANCELED | The user cancelled the operation or the app aborted the flow |
RESULT_OK does not mean the payment was authorized. It only means the Get Smart app completed its process. You must check the RESULT extra to determine authorization status.
Transaction Result Values
The RESULT extra in the response Intent contains the transaction outcome:
| Value | Meaning |
|---|---|
"AUTORIZADA" | The payment was authorized |
"DENEGADA" | The payment was denied or failed |
Transaction Types
The App2App integration supports two primary transaction types, each with specific parameters and use cases.
Sale (Venta)
A standard purchase transaction where the amount is charged to the customer’s card and an authorization code is returned if successful. Set the type parameter to 1.
Refund (Devolución)
A return or reversal of a previous transaction. Set the type parameter to 2 and include the original_order parameter with the order number of the transaction being refunded.
Receipt Handling
Receipt printing is handled entirely by the Get Smart application, eliminating the need for your application to manage printer hardware or receipt formatting.
Merchant Receipt - Printed automatically after a successful transaction. Contains transaction details and signatures required for record-keeping.
Customer Receipt - The Get Smart app presents an option to print the customer receipt. The customer or merchant can choose whether to print.
The onActivityResult callback is triggered only after all receipt workflows have completed.
Error Scenarios
Understanding common error scenarios helps you implement robust error handling and provide clear feedback to users when transactions cannot be completed.
Application Not Installed - If the Get Smart app is not installed, Android throws ActivityNotFoundException. Your app must catch this exception and display an appropriate message to the user.
Transaction Denied - If the transaction is denied, resultCode will be RESULT_OK, RESULT extra will be "DENEGADA", and RESPCODE and ERROR_MSG extras contain denial details.
User Cancellation - If the user cancels the transaction, resultCode will be RESULT_CANCELED. No transaction was attempted and no authorization or denial occurred.
Timing Considerations
Transaction processing times vary based on several factors, and your application must be designed to handle these variations gracefully without timing out or disrupting the user experience.
Transaction Duration - Transaction processing time varies based on card reading method (chip is slower than contactless), network connectivity, receipt printing, and user interaction time. Your application should not timeout while waiting for the result. The Android onActivityResult callback will always be triggered when the Get Smart app completes.
Activity Lifecycle - While the Get Smart app is active, your Activity may be paused or stopped, and the system may reclaim resources if memory is low. Ensure your Activity can properly handle recreation after the payment completes.
Next Steps
- Learn how to create a single-step payment in Create a Single-Step Payment
- Understand how to handle results in Handle Transaction Results
- Review all response parameters in Response Parameters Reference