
Quickstart: Create Payment
This guide helps you create your first successful payment transaction. You’ll authenticate with the API, submit a payment request, and verify the transaction status.
Step 1: Get a credential
Once your account is activated, you will receive your Test Account and API keys that will enable you to start with the integration.
Step 1 is only available for Argentina, Chile and Mexico.
To generate the credential, at the Getnet Merchant Portal, follow the steps below:
All contracted products will be shown on this screen and the credential generation is going to be enabled by solution.
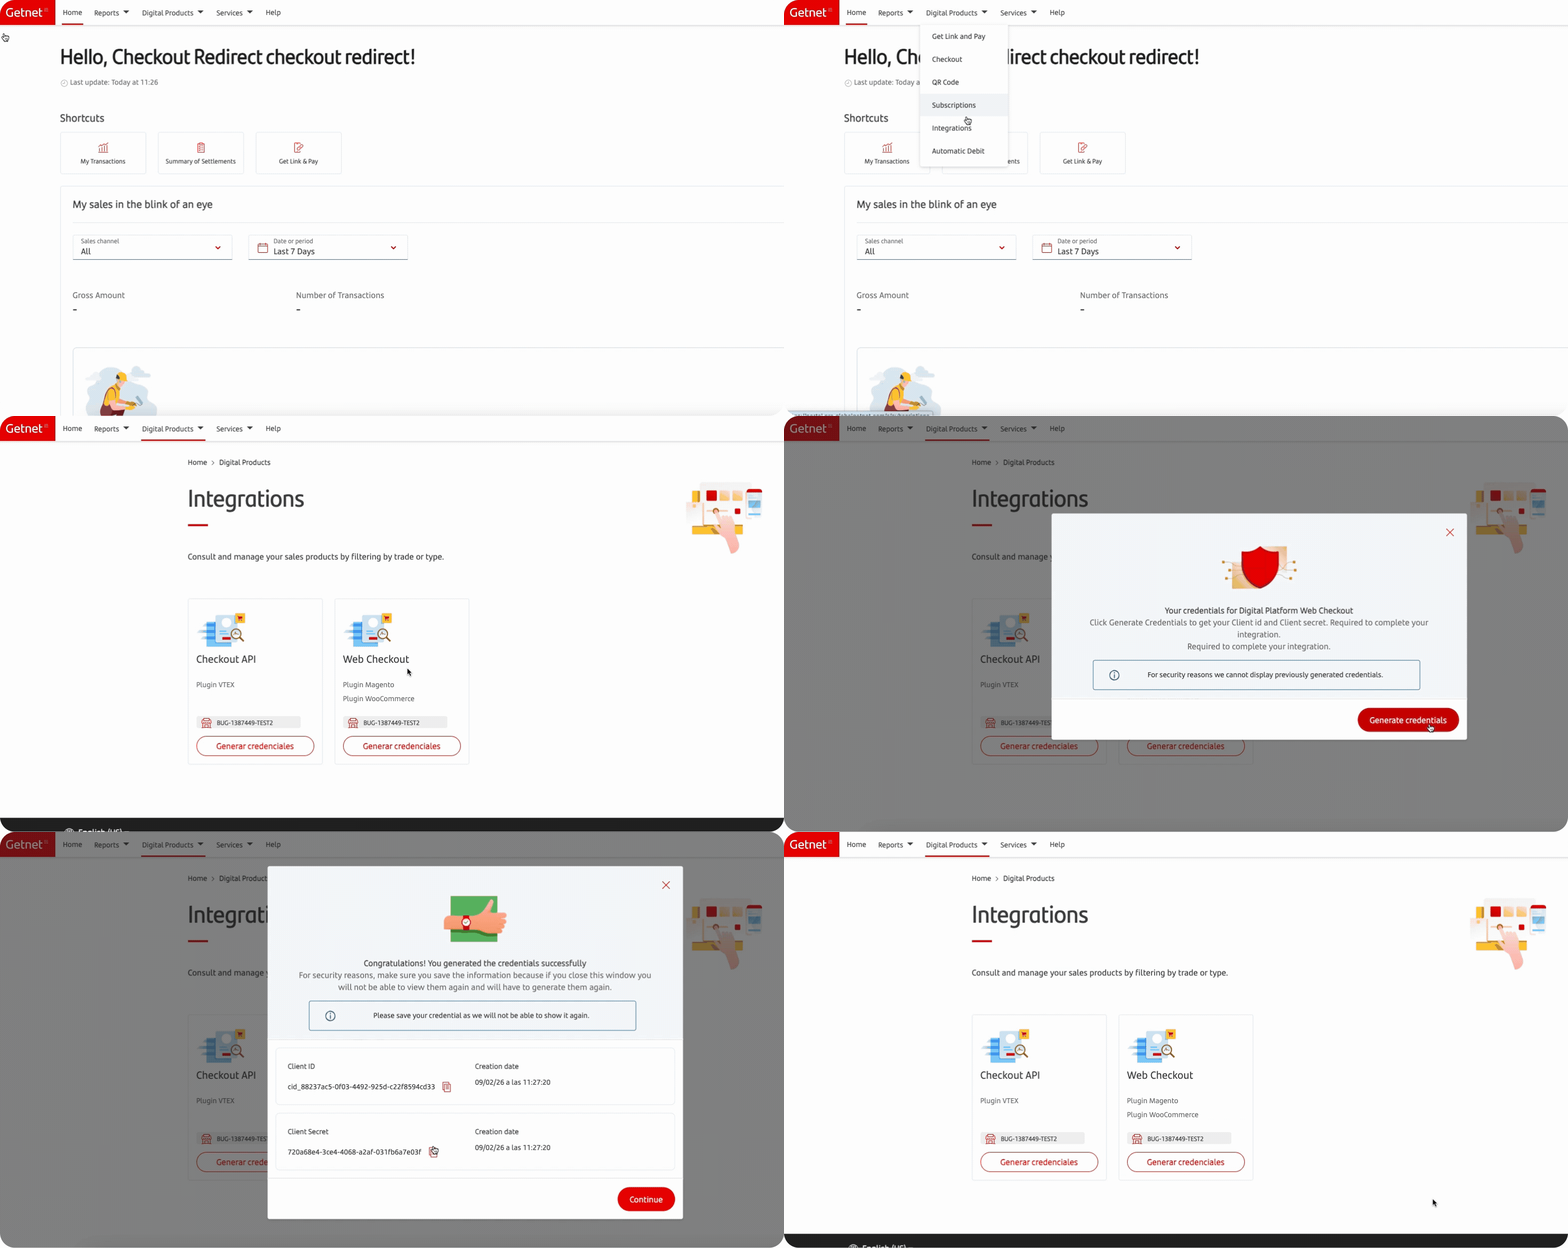
- Select Digital Products.
- In the dropdown menu, select Integrations.
- Click Generate credentials.
- In the pop up warning, click Generate credentials.
- Your credential is created. Please save your credential as it will not be able to show it again.
- Copy and paste the Client ID.
- Copy and paste the Client Secret.
- Click Continue.
If you lose the keys, repeat the step-by-step to generate a new one.
Step 2: Retrieving Access token
You must first obtain an access token. This requires your Client ID and Client Secret. To retrieve your credentials access Credentials document and follow the steps.
There are other request that can be done to retrive an access token, check the Authentication document to know more about this requests.
Request example
curl --location '{{host_getnet_api}}/authentication/oauth2/access_token'
--header 'Content-Type: application/x-www-form-urlencoded'
--header 'Accept: application/json'
--data-urlencode 'grant_type=client_credentials'
--data-urlencode 'client_id={{PUT_YOUR_CLIENT_ID_HERE}}'
--data-urlencode 'client_secret={{PUT_YOUR_CLIENT_SECRET_HERE}}'Response example
{
    "access_token": "eyJ0eXAiOiJKV1QiLCJraWQiOiI1amhLMy9xK0ZpK0tTRkIrRUwwN3VhMFYwdGM9Ii...",
    "scope": "name-scope:r",
    "token_type": "Bearer",
    "expires_in": 3599
}Step 3: Create a Payment Intent
Once you have obtained an access token, a payment intent must be created whenever the customer initiates the checkout process by clicking the payment button on your web store.
The payment intent allows the frontend to load the Checkout interface and proceed with the transaction securely.
Using a payment intent ensures that the customer is charged the exact amount specified during its creation. Since the payment intent is generated on the backend, the defined amount remains consistent throughout the entire payment flow and cannot be modified, either accidentally or maliciously, from the frontend.
To create a payment intent, send an HTTP POST request including the previously obtained access_token in the Authorization header. A successful response will return the payment intent ID and redirect URL, which are required for the frontend implementation, depending on the chosen integration method.
For more details, see the API reference
| Endpoint |
|---|
POST /payment-intent |
Required fields
| Field | Type | Description | Example |
|---|---|---|---|
payment.currency | String | Currency code. | BRL |
payment.amount | Integer | Purchase amount in integer format, where the last 2 digits represent the cents. For countries where cents do not apply, fill in the amount with 2 zeros to the right. | 92500 |
customer.customer_id | String | Recommend using the customer’s document number, only letters and numbers, without any special characters, separators or spaces. | 12345678912 |
customer.first_name | String | Customer’s first name. | John |
customer.last_name | String | Customer’s last name. | Doe Smith |
customer.name | String | Customer’s full name. | John Doe Smith |
customer.email | String | Customer’s email address. | customer@email.com.br |
customer.document_type | String | Type of the document used to identify the customer. Check the Field Values table to see the accepted values. | CPF |
customer.document_number | String | Document number used to identify the customer. | 12345678912 |
customer.billing_address.street | String | Name of a street. | Av. Brasil |
customer.billing_address.number | String | Number that identifies the position of a building on a street. | 1000 |
customer.billing_address.country | String | Country code. Check the Field Values table to see the accepted values. | BR |
customer.billing_address.postal_code | String | Postal or ZIP code. | 90230060 |
Conditional fields (Uruguay only)
| Field | Type | Description | Example |
|---|---|---|---|
additional_data | Object | Additional data for regional regulations and tax requirements. Required for Uruguay. | --- |
additional_data.rates | Array | Tax rates applied to the transaction. | --- |
additional_data.rates.key | String | (Uruguay only). Type of tax or rate being applied. | IVA |
additional_data.rates.value | Number | (Uruguay only). Tax amount in integer format (cents) | 123 |
additional_data.regional_regulation_code | String | (Uruguay only). Regional fiscal or regulatory code required by local authorities. Used for SEP submissions in Uruguay. | 17934 |
Optional fields
| Field | Type | Description | Example |
|---|---|---|---|
configurations | Object | Additional configurations for the payment intent | --- |
configurations.3ds | Boolean | Controls 3D Secure authentication. | true or false |
configurations.preauthorization | Boolean | Indicates if the payment is a pre-authorization. | true or false |
configurations.card_verification | Boolean | Indicates if this is a card verification flow. | true or false |
configurations.success_url | String | Redirect URL in case of successful payment. | https://www.mystore.com/checkout/success |
configurations.error_url | String | Redirect URL in case of an error during payment. | https://www.mystore.com/checkout/error |
expires_at | String | Payment intent expiration. | 3d4h15m |
Field Values
| Field | Argentina | Brazil | Chile | Espanha | Mexico | Uruguay |
|---|---|---|---|---|---|---|
currency | ARS | BRL | CLP | EUR | MXN | UYU or USD |
document_type | DNI | CPF, CNPJ or passport | RUT | DNI, INE or passport | RFC | uyci |
country | AR | BR | CH | ES | MX | UY |
key | - | - | - | - | - | IVA |
Field filling rules:
- The
expires_atfield accepts a duration value (for example, 15m, 2h, 7d, or 1d12h30m). This duration is applied regardless of the merchant’s timezone. The expiration timestamp returned by the API is always formatted in GMT+0 (UTC). If no value is provided, the payment intent does not expire. - When
success_urlanderror_urlis provided in the payment intent request, it will overrides the value configured in the seller’s technical configuration. - Uruguay: Sellers can create payment intents in either UYU (Uruguayan Peso) or USD. When paying in UYU, the
additional_dataobject is required and must include theadditional_data.rates.keywith IVA rate key and theregional_regulation_codefor SEP compliance. - Argentina:
card_verificationandpreauthorizationare not available for Argentina.
Request example
{
  "mode": "instant",
  "order_id": "ORDER_UY_97531",
  "configurations": {
    "3ds": true,
    "preauthorization": false,
    "card_verification": false,
    "success_url": "https://www.mystore.com/checkout/success",
    "error_url": "https://www.mystore.com/checkout/error"
  },
  "payment": {
    "currency": "UYU",
    "amount": 120000
  },
  "product": [
    {
      "product_type": "service",
      "title": "Curso de inglés online",
      "description": "Curso completo de 6 meses",
      "value": 120000,
      "quantity": 1
    }
  ],
  "customer": {
    "customer_id": "customer_uy_005",
    "first_name": "Laura",
    "last_name": "Fernández Rodríguez",
    "name": "Laura Fernández Rodríguez",
    "email": "laura.fernandez@example.com.uy",
    "document_type": "ci",
    "document_number": "45678912",
    "phone_number": "59899123456",
    "gender": "Female",
    "checked_email": true,
    "billing_address": {
      "street": "Av. 18 de Julio",
      "number": "1234",
      "complement": "Apto 601",
      "district": "Centro",
      "city": "Montevideo",
      "state": "Montevideo",
      "country": "UY",
      "postal_code": "11200",
      "reference": "Entre Río Branco y Convención"
    }
  },
  "shipping": {
    "first_name": "Laura",
    "last_name": "Fernández Rodríguez",
    "name": "Laura Fernández Rodríguez",
    "phone_number": "59899123456",
    "shipping_amount": 0,
    "address": {
      "street": "Av. 18 de Julio",
      "number": "1234",
      "complement": "Apto 601",
      "district": "Centro",
      "city": "Montevideo",
      "state": "Montevideo",
      "country": "UY",
      "postal_code": "11200",
      "reference": "Entre Río Branco y Convención"
    }
  },
  "pickup_store": false,
  "shipping_method": "UES",
  "soft_descriptor": "Tienda UY",
  "additional_data": {
    "rates": [
      {
        "key": "Iva",
        "value": 22
      }
    ],
    "regional_regulation_code": ["17934"]
  },
  "expires_at": "1h"
}Response example
{
  "payment_intent_id": "f6ee8bc7-229d-4d9d-bced-7dd2371a1f57",
  "trade_name": "GetNet Store",
  "redirect_url": "https://www.globalgetnet.com/hosted-web-checkout/eyJraWQiOiJQQUdPTlhUL..."
}Step 4: Frontend integration
Once your backend integration is complete, a successful payment intent creation will return two keys properties required (redirect_url and payment_intent_id) to integrate Getnet’s Web Checkout into your frontend.
The property you use depends on the chosen integration format, that can be by JavaScript or React implementation.
- For the Redirect (Getnet-hosted) Web Checkout, use the URL provided in the
redirect_urlproperty to open a new page for the shopper. - For Web Checkout options using Iframe or Lightbox formats, extract the
payment_intent_idfrom the response and follow the corresponding steps to embed the Checkout interface on your web store’s payment page.
Import the Getnet loader
The loader is responsible for initializing the secure Getnet Checkout application. It must be invoked after a payment intent has been created to allow the customer to safely enter their payment details and proceed with the transaction.
To consume the APIs use the following DNS values for the host_getnet_web:
- https://www.pre.globalgetnet.com (homologation environment)
- https://www.globalgetnet.com (production environment)
Then, add the following code:
For JavaScript:
<script src="${host_getnet_web}/digital-checkout/loader.js" />For React:
useEffect(() => {
const script = document.createElement("script");
script.src = "${host_getnet_web}/digital-checkout/loader.js";
script.async = true;
script.setAttribute("data-testid", "digital-checkout");
script.setAttribute("id", "digital-checkout");
document.body.appendChild(script);
}, []);Add the checkout script
The checkout script will make a connection between the loader and the user, and also allow you to select the integration option that better fits your needs.
To do so, add the following code and replace the paymentIntentId value with the payment_intent_id previously received, and modify the checkoutType value with lightbox or iframe depending on your selection:
For JavaScript:
<script>
const config = { "paymentIntentId": ${payment_intent_id}, "checkoutType": "lightbox" };
const checkoutButton = () => { loader.init(config) };
</script>For React:
useEffect(() => { ...
const config = { paymentIntentId: ${payment_intent_id}, checkoutType: "lightbox" };
}, []);Add the checkout button
The button is responsible for running the checkout script shown in the previous step. Add the following code to your html:
For JavaScript:
<button onclick="checkoutButton()"> Go to Payment </button>If you are using React, in this step you have to initiate the Getnet loader:
useEffect(() => { ...
window.loader.init(config);
}, []);This will be the final code for React:
useEffect(() => {
const script = document.createElement("script");
script.src = "${host_getnet_web}/digital-checkout/loader.js";
script.async = true;
script.setAttribute("data-testid", "digital-checkout");
script.setAttribute("id", "digital-checkout");
document.body.appendChild(script);
const config = { paymentIntentId: ${payment_intent_id}, checkoutType: "lightbox" };
window.loader.init(config);
}, []);Change the position of the iFrame
If you choose the iFrame format for your checkout integration, the iFrame is inserted by default as the last element of the page. You can adjust its position by manipulating the element within the DOM to better fit your layout and design requirements.
The example below shows how to create the iFrame with an identifier and manipulate it in the DOM.
JavaScript
<div id="iframe-section"></div>

<script>
const config = {
    "paymentIntentId": "PAYMENT_INTENT_ID_HERE",
    "checkoutType": "iframe"
};
const checkoutButton = () => {
    loader.init(config);

    const iframeSection = document.getElementById("iframe-section");
    const iframe = document.querySelector("iframe");
    iframeSection.appendChild(iframe);
};
</script>Transaction Flow
Follow the steps to process a payment.
- The payment process begins when the buyer clicks the designated payment button.
- The checkout screen will display the payment intention value, as well as the available payment methods depending on Merchant Portal or API’s configuration.
- For payments made by credit or debit card, the buyer will enter their card details. If the brand and type of card provided support installment payments, a transparent query will be sent to Getnet’s Installments API to retrieve the available installment options for this checkout.
- The installments offered are based on the agreements contracted with Getnet and the pre-configurations made in the merchant’s portal or API configurations, where you determine whether to offer installments with or without interest and set a limit on the number of installments.
- By clicking the button, the buyer will start the payment authorization process.
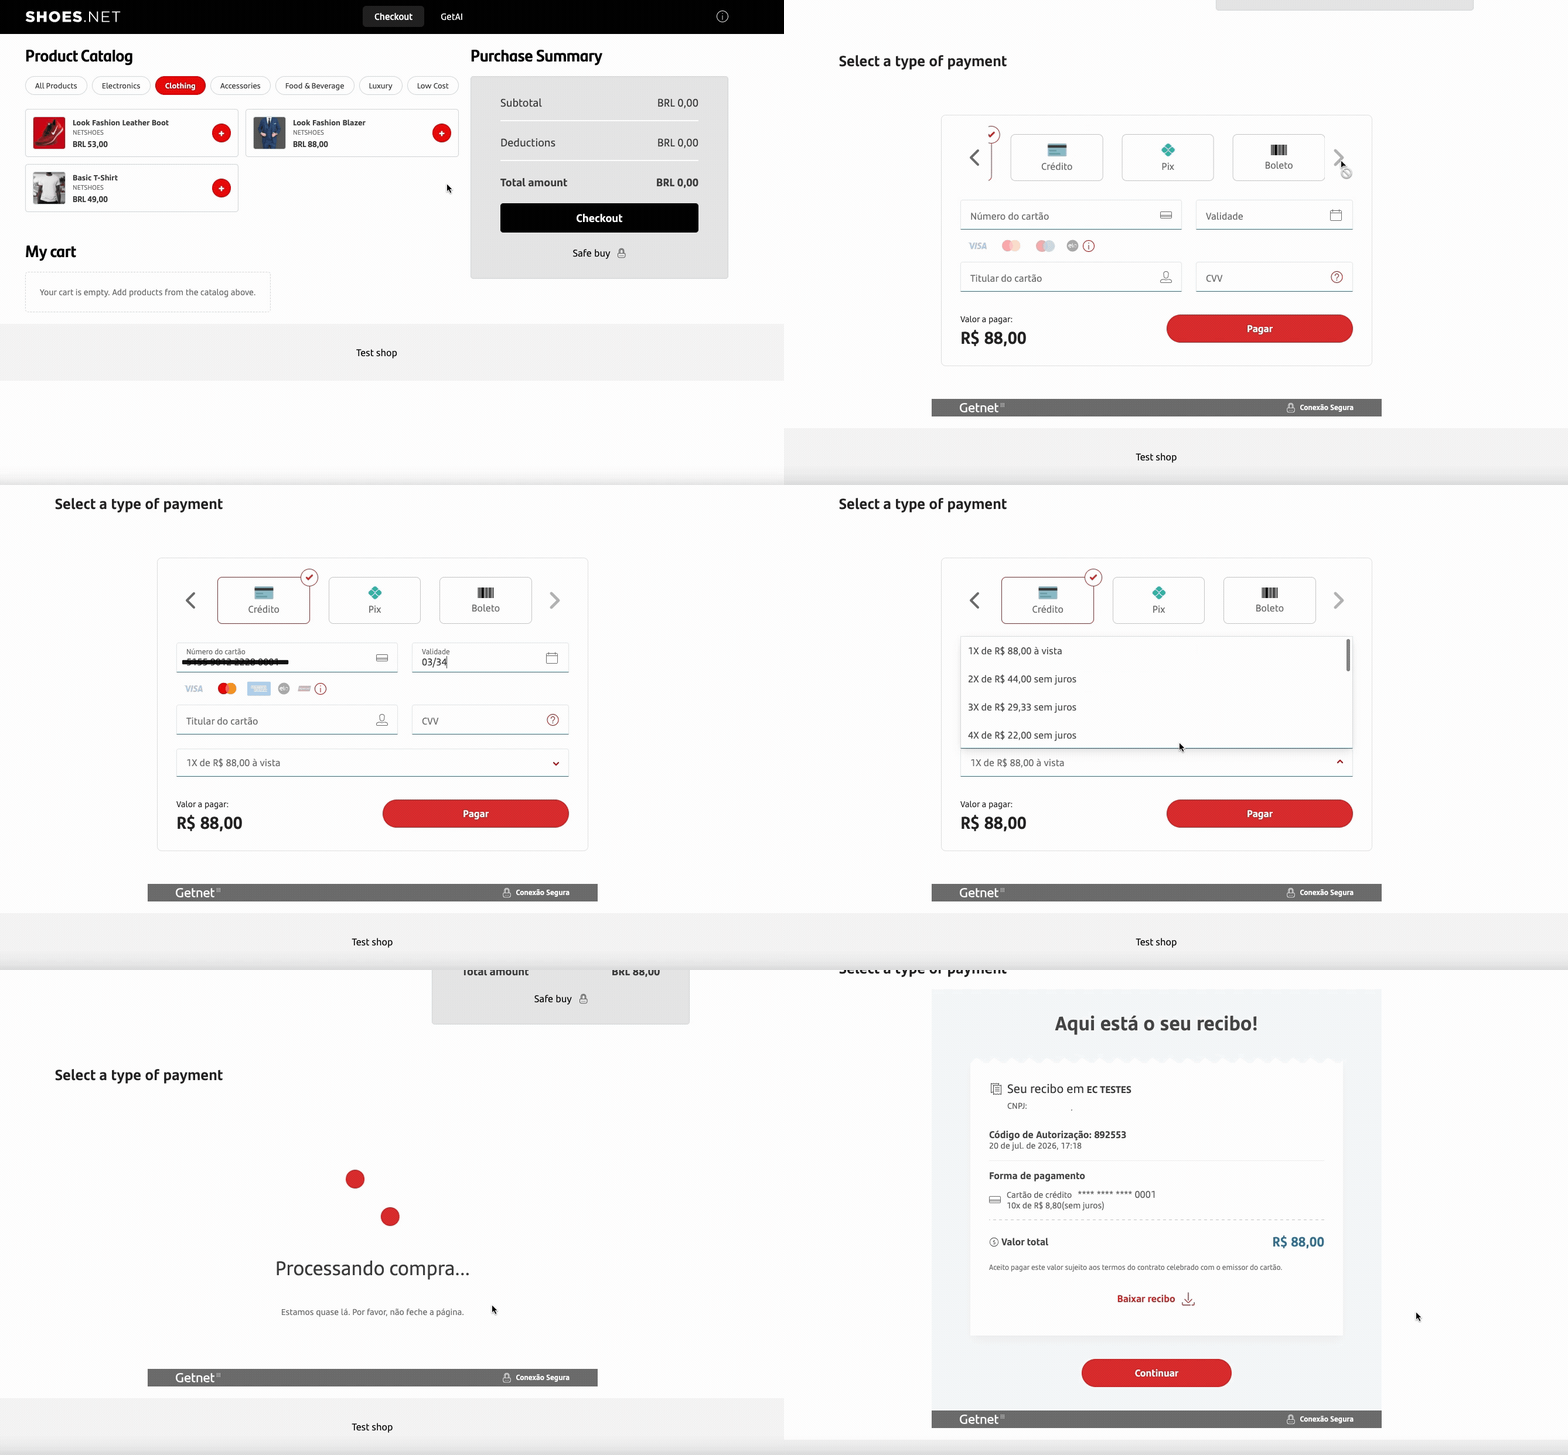
Payment Authorization Process – Getnet Web Checkout
The authorization process for each payment involves several critical steps designed to ensure the security, integrity, and compliance of every transaction:
- Device Fingerprint Capture: Collects device information to support fraud analysis.
- 3D Secure Authentication (3DS): Applied when supported by the card’s country of origin, brand, issuer, and type.
- Card Tokenization: In compliance with PCI DSS standards, sensitive card data is neither transmitted nor stored during the authorization process. Instead, the card is tokenized at the start of the flow, and only the generated token is transmitted between internal APIs.
- Payment Method Validation: Verifies that the selected payment method, card brand, and installment plan are compatible with the products and services contracted by the merchant.
- Fraud Analysis: Conducted via Getnet’s AntiFraud API, based on rules defined by the relevant Getnet team in each country.
- Payment Authorization: The final step, where the transaction is authorized through communication with the appropriate financial institutions.
At the conclusion of this process, the Web Checkout client application receives a response indicating either Success or Failure:
- Failure: If the payment is declined or any issue is detected during the process, an error message is displayed to the buyer. Additionally, a webhook or notification is sent containing the payment details and the transaction status.
- Success: If the payment is authorized, a confirmation message is displayed to the buyer. A webhook or notification is also sent with the authorization data and transaction status. At this stage, the payment_id is generated, which can be used for cancellation or refund operations (refer to the Modifying Payments documentation for further details).
Example of an AUTHORIZED transaction payload:
    {
  "payment_intent_id": "1f9f47ed-65cc-4fbf-a407-0f17df9a2e2c",
  "checkout_id": "5ab15d1e-ea8b-4560-84d2-fb3d02179537",
  "order_id": "YOUR_ORDER_ID",
  "mode": "instant",
  "seller": {
    "id": "716d899e-9091-4577-a12f-8a77ec4d1e0b",
    "trade_name": "GetNet Shop",
    "merchant_document": "00000000000",
    "settings": {
      "notification_url_configured": true
    }
  },
  "customer": {
    "customer_id": "c129d793-d204-4610-8819-b8fb720a8552",
    "first_name": "John",
    "last_name": "Doe",
    "name": "John Doe",
    "email": "johndoe@emailtest.com",
    "document_type": "dni",
    "document_number": "1111111111111",
    "checked_email": false,
    "billing_address": {
      "street": "South Rockledge St",
      "number": "00",
      "complement": "Rockville",
      "country": "AR",
      "postal_code": "00000000"
    }
  },
  "shipping": {
    "first_name": "John",
    "last_name": "Doe",
    "name": "John Doe",
    "address": {
      "street": "South Rockledge St",
      "number": "00",
      "complement": "Rockville",
      "country": "AR",
      "postal_code": "00000000"
    }
  },
  "payment": {
    "method": "credit",
    "amount": 14100,
    "currency": "ARS",
    "installment": {
      "quote_id": "f054ce63-0475-406f-8eca-25aea5dae6a8",
      "schema": "plan_name",
      "type": "with_interest",
      "number": 6
    },
    "payment_method": {
      "token_id": "e327bae6-286e-4920-addb-5f4b10315b4e"
    },
    "result": {
      "payment_id": "3a76acae-d9c0-421c-91e0-cf5ce8aca098",
      "status": "Authorized",
      "authorization_code": "999999",
      "transaction_datetime": "2024-01-01T12:00:00.000Z"
    }
  },
  "pickup_store": false,
  "product": [
    {
      "product_type": "cash_carry",
      "title": "Look Fashion Leather Boot",
      "value": 5300,
      "quantity": 1
    },
    {
      "product_type": "cash_carry",
      "title": "Look Fashion Blazer",
      "value": 8800,
      "quantity": 1
    }
  ],
  "frontend": {
    "link": "https://www.globalgetnet.com/",
    "time_page": 39,
    "sales_channel": "WEB",
    "application_version": "0.0.0",
    "card_pasted": true,
    "ip": "000.000.00.00",
    "timezone": "America/Sao_Paulo",
    "locale": "en-US"
  },
  "created_at": "2024-01-01T12:00:00.000Z",
  "updated_at": "2024-01-01T12:00:00.000Z"
}Example of a DENIED transaction payload:
    {
  "payment_intent_id": "1f9f47ed-65cc-4fbf-a407-0f17df9a2e2c",
  "checkout_id": "5ab15d1e-ea8b-4560-84d2-fb3d02179537",
  "order_id": "YOUR_ORDER_ID",
  "mode": "instant",
  "seller": {
    "id": "716d899e-9091-4577-a12f-8a77ec4d1e0b",
    "trade_name": "GetNet Shop",
    "merchant_document": "00000000000",
    "settings": {
      "notification_url_configured": true
    }
  },
  "customer": {
    "customer_id": "c129d793-d204-4610-8819-b8fb720a8552",
    "first_name": "John",
    "last_name": "Doe",
    "name": "John Doe",
    "email": "johndoe@emailtest.com",
    "document_type": "dni",
    "document_number": "1111111111111",
    "checked_email": false,
    "billing_address": {
      "street": "South Rockledge St",
      "number": "00",
      "complement": "Rockville",
      "country": "AR",
      "postal_code": "00000000"
    }
  },
  "shipping": {
    "first_name": "John",
    "last_name": "Doe",
    "name": "John Doe",
    "address": {
      "street": "South Rockledge St",
      "number": "00",
      "complement": "Rockville",
      "country": "AR",
      "postal_code": "00000000"
    }
  },
  "payment": {
    "method": "credit",
    "amount": 14100,
    "currency": "ARS",
    "installment": {
      "quote_id": "f054ce63-0475-406f-8eca-25aea5dae6a8",
      "schema": "plan_name",
      "type": "with_interest",
      "number": 6
    },
    "payment_method": {
      "token_id": "e327bae6-286e-4920-addb-5f4b10315b4e"
    },
    "result": {
      "payment_id": "3a76acae-d9c0-421c-91e0-cf5ce8aca098",
      "status": "Denied",
      "return_message": "Card not accepted for this operation",
      "transaction_datetime": "2024-01-01T12:00:00.000Z"
    }
  },
  "pickup_store": false,
  "product": [
    {
      "product_type": "cash_carry",
      "title": "Look Fashion Leather Boot",
      "value": 5300,
      "quantity": 1
    },
    {
      "product_type": "cash_carry",
      "title": "Look Fashion Blazer",
      "value": 8800,
      "quantity": 1
    }
  ],
  "frontend": {
    "link": "https://www.globalgetnet.com/",
    "time_page": 39,
    "sales_channel": "WEB",
    "application_version": "0.0.0",
    "card_pasted": true,
    "ip": "000.000.00.00",
    "timezone": "America/Sao_Paulo",
    "locale": "en-US"
  },
  "created_at": "2024-01-01T12:00:00.000Z",
  "updated_at": "2024-01-01T12:00:00.000Z"
}